So recently while browsing around some stuff about about Windows 10, I found out about OneGet. This is a package manager manager in Powershell. I think this could be super useful. So one of the package managers I added was Chocolatey. I also wanted to install the GUI for I figure it may be easier to browse packages that way. Upon installation and execution, I got met with a huge error screen along the lines of:
System.IO.InvalidDataException: invalid Chocolatey Path. Check that chocolateyInstall is correct in the app.config
So on and so fourth. After reading through the git page on this error and taking some time to consider the confusion around "how did you install chocolatey?" I realized that specifically it's not actually installed when you just add it to OneGet. So here's the fix. After you add chocolatey, you need to INSTALL it. Just like this:
Install-Package chocolatey
After that, it should run without a hitch. Hope this helps someone out there. Package managers are great, aren't they?

Thursday, July 6, 2017

Sunday, May 14, 2017
Kali Live with Persistence and Updating
So recently I was trying to set up Kali Linux on a live USB fully updated. I kept running into a few problems with it that ultimately are based on how the instructions online are worded. After modifying the steps, I managed to create a fully updated Kali Linux live USB and hopefully you can set one up as well by following these instructions.
So the obvious first step is to download the most recent ISO image that you plan on using. At the time of this writing, that would be 2017.1 and I will be using the 64 bit, so my ISO file is named:
kali-linux-2017.1-amd64.iso
Starting from Windows, I use a program called Rufus to create a live USB. It's a very handy program to keep around and my go to for this stuff on Windows. At work, it's gotten disks working with less effort than all the random tools my co-workers download from the random tutorials they read and with no installation required you can keep it on removable medium and have it with you for when you need it. So download that as well, pop your USB drive in and load up Rufus. Then you need to select your ISO file.

After selecting the ISO, the drop down should say something about it being a DD image, and that's exactly what we want. Tell it to start and let the magic happen.

Starting from Linux, we are going to ignore the dd command (dd if=kali-linux-2017.1-amd64.iso of=/dev/sdb bs=512k) because that's both complicated and pointless. A much simpler way to get this done with a LOT less to remember is the cat command. Assuming the drive is /dev/sdb, we simply do: cat kali-linux-2017.1-amd64.iso > /dev/sdb
Simple, easy to remember since it's not using a different syntax style than other bash commands and straight forward. I've also read online that cat is quicker and has less overhead than dd, but I do not know enough about them to confirm or deny these claims. I just think it's a lot easier and gets the job done just as well.
Now with this drive ready to boot from, we shall move on to the next step through Kali because then we know we have the simple and easy tools we need to get the persistence set up. So boot on into Kali and select Live, NOT PERSISTENCE. We need to create the persistence partition. In the actual instructions, they list off some commands than every time I try, they do not work. Even when in Kali Live itself. The commands themselves are a bit beyond my understanding, but that seems to happen every time someone makes a "copy and paste" tutorial because they need to compensate for dynamic possibilities. I, on the other hand, think gparted is a perfectly acceptable solution for today's day in age. If you want to do this via command, I suggest you learn the parted command and do it yourself rather than copy-paste.
So first, press the windows key on your keyboard or bump the top left corner with your mouse. That should bring you to the activities view. Type in "gp" and an icon for gparted should show up, click on that to open it up.

Right click on the empty space and select New. Create an ext3 partition with the label persistence.
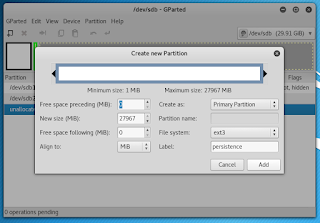
Now click on the apply arrow.

Now we are entering the home stretch. The command portion. Open up a terminal, it's the little black icon on the left dock. Enter in these commands:
mount /dev/sdb3 /mnt
echo "/ union" > /mnt/persistence.conf
umount /mnt
Now we reboot the computer to Live with persistence. On some random installation like this, I have run into just a black screen with a pointer. To fix that, I pressed ctrl+alt+f2, which should bring you into TTY2. Then run the command:
kill -9 $(pgrep gnome)
This then dumped me back over to TTY1 and after some time the desktop came back up on TTY3 (ctrl+alt+f3). In the meantime, I just updated on TTY2.
So to finish things off with a clean and easy update:
apt-get update && apt-get upgrade -y
Hopefully this will help anyone struggling with this process. I did notice a lot of people ran into the same problems I did, so now to list off those problems and what caused them for me:
Out of space because updates going into the disk image.
This was caused by booting into persistence and trying to do things before persistence was set up which then lead to an non-bootable USB.
Boots to a black screen with a cursor.
I don't know the cause of it, but killing all gnome related processes seems to correct it. While performing this process
Could not write files while updating.
This was another case of not having the persistence set up properly.
So the obvious first step is to download the most recent ISO image that you plan on using. At the time of this writing, that would be 2017.1 and I will be using the 64 bit, so my ISO file is named:
kali-linux-2017.1-amd64.iso
Starting from Windows, I use a program called Rufus to create a live USB. It's a very handy program to keep around and my go to for this stuff on Windows. At work, it's gotten disks working with less effort than all the random tools my co-workers download from the random tutorials they read and with no installation required you can keep it on removable medium and have it with you for when you need it. So download that as well, pop your USB drive in and load up Rufus. Then you need to select your ISO file.

After selecting the ISO, the drop down should say something about it being a DD image, and that's exactly what we want. Tell it to start and let the magic happen.

Starting from Linux, we are going to ignore the dd command (dd if=kali-linux-2017.1-amd64.iso of=/dev/sdb bs=512k) because that's both complicated and pointless. A much simpler way to get this done with a LOT less to remember is the cat command. Assuming the drive is /dev/sdb, we simply do: cat kali-linux-2017.1-amd64.iso > /dev/sdb
Simple, easy to remember since it's not using a different syntax style than other bash commands and straight forward. I've also read online that cat is quicker and has less overhead than dd, but I do not know enough about them to confirm or deny these claims. I just think it's a lot easier and gets the job done just as well.
Now with this drive ready to boot from, we shall move on to the next step through Kali because then we know we have the simple and easy tools we need to get the persistence set up. So boot on into Kali and select Live, NOT PERSISTENCE. We need to create the persistence partition. In the actual instructions, they list off some commands than every time I try, they do not work. Even when in Kali Live itself. The commands themselves are a bit beyond my understanding, but that seems to happen every time someone makes a "copy and paste" tutorial because they need to compensate for dynamic possibilities. I, on the other hand, think gparted is a perfectly acceptable solution for today's day in age. If you want to do this via command, I suggest you learn the parted command and do it yourself rather than copy-paste.
So first, press the windows key on your keyboard or bump the top left corner with your mouse. That should bring you to the activities view. Type in "gp" and an icon for gparted should show up, click on that to open it up.

Right click on the empty space and select New. Create an ext3 partition with the label persistence.

Now click on the apply arrow.

Now we are entering the home stretch. The command portion. Open up a terminal, it's the little black icon on the left dock. Enter in these commands:
mount /dev/sdb3 /mnt
echo "/ union" > /mnt/persistence.conf
umount /mnt
Now we reboot the computer to Live with persistence. On some random installation like this, I have run into just a black screen with a pointer. To fix that, I pressed ctrl+alt+f2, which should bring you into TTY2. Then run the command:
kill -9 $(pgrep gnome)
This then dumped me back over to TTY1 and after some time the desktop came back up on TTY3 (ctrl+alt+f3). In the meantime, I just updated on TTY2.
So to finish things off with a clean and easy update:
apt-get update && apt-get upgrade -y
Hopefully this will help anyone struggling with this process. I did notice a lot of people ran into the same problems I did, so now to list off those problems and what caused them for me:
Out of space because updates going into the disk image.
This was caused by booting into persistence and trying to do things before persistence was set up which then lead to an non-bootable USB.
Boots to a black screen with a cursor.
I don't know the cause of it, but killing all gnome related processes seems to correct it. While performing this process
Could not write files while updating.
This was another case of not having the persistence set up properly.
Saturday, May 13, 2017
Linux ESXi Screen Resolution Will Not Change
I ran into a problem with an ESXi server at work, version 5.5 but I assume the solution will be the same on other versions. The screen resolution would not change. The solution was pretty simple. Edit the virtual machine settings and up the video memory. I found that small increases or using the recommended settings was not enough, so I set it to 32MB and it seemed to work great after that.
Friday, March 4, 2016
Malware: 1-855-298-4477
So while at work, I get an email. Someone has a popup saying stuff along the lines of malware detected, your computer is locked, don't reboot or you could damage your system. Then it says repeatedly to call "tech support" at 1-855-298-4477. After looking at the screen shot, it was easy to tell the problems. First, it was in a web browser. Second, the spacing was all messed up.Like this. Most importantly, it just says "call tech support" and not specifically who this tech support is supposed to be. So, obviously just close the window and move on.
Now being the jerk that I am, I decide while I have a moment to call the number. The number seems to re-route you to different recipients, all who answer along the lines of "this is tech support, how may I help you?" So when I get that, I hang up and cross my fingers I get a call back. I do. The number was marked as being in Texas, but I highly doubt that was its origin. The number was 1-713-589-4442. So the guy calls and says that he missed my call and asks how he can help. There was a thick accent, so I had to get him to repeat it 3 times before he slowed down so I could hear what he was trying to say.
I blatantly ask him "is this a tech support scam?" I imagine he was either terrible at English or just didn't understand me because he said yes and asked how he could help. So I tell him that he's not listening, and I asked if it was a scam. He tells me he's tech support and can remotely connect to remove the malware. I let him know that first off, a web browser isn't going to detect malware on your computer like that and that I am the tech support. After a bit of back and forth and me insisting that it is indeed a scam, he replied that if companies like Microsoft charge for fixing computers and it's not a scam then they were not a scam.
Eventually... he hung up on me. I imagine it was something to do with me laughing at him and calling it a stupid scam.
Now the reason I post this is for a simple reason. I believe that if you can recognize scams like these, you should pick up the phone and bug the scammers and liars. Try this number if you want, call them up and if "tech support" answers, have some fun. Make a bogus report and give them fake credit card info or just simply call them out. I think scams like this are done just simply because it is so easy as most people who can tell it is a scam just ignore it and those that can't lose.
That's just my thoughts, anyway. It really bothers me when others take advantage of people like that.
***Edit: Just wanted to add this because I decided to call it again just because. So, this guy I ask for the name of the company he works for. After some poking and prodding, I get him spewing out some really bad fake information about his company and its support. Eventually, after pointing out he didn't know jack, he hung up and then all I got was a disconnected message. How rude.
Now being the jerk that I am, I decide while I have a moment to call the number. The number seems to re-route you to different recipients, all who answer along the lines of "this is tech support, how may I help you?" So when I get that, I hang up and cross my fingers I get a call back. I do. The number was marked as being in Texas, but I highly doubt that was its origin. The number was 1-713-589-4442. So the guy calls and says that he missed my call and asks how he can help. There was a thick accent, so I had to get him to repeat it 3 times before he slowed down so I could hear what he was trying to say.
I blatantly ask him "is this a tech support scam?" I imagine he was either terrible at English or just didn't understand me because he said yes and asked how he could help. So I tell him that he's not listening, and I asked if it was a scam. He tells me he's tech support and can remotely connect to remove the malware. I let him know that first off, a web browser isn't going to detect malware on your computer like that and that I am the tech support. After a bit of back and forth and me insisting that it is indeed a scam, he replied that if companies like Microsoft charge for fixing computers and it's not a scam then they were not a scam.
Eventually... he hung up on me. I imagine it was something to do with me laughing at him and calling it a stupid scam.
Now the reason I post this is for a simple reason. I believe that if you can recognize scams like these, you should pick up the phone and bug the scammers and liars. Try this number if you want, call them up and if "tech support" answers, have some fun. Make a bogus report and give them fake credit card info or just simply call them out. I think scams like this are done just simply because it is so easy as most people who can tell it is a scam just ignore it and those that can't lose.
That's just my thoughts, anyway. It really bothers me when others take advantage of people like that.
***Edit: Just wanted to add this because I decided to call it again just because. So, this guy I ask for the name of the company he works for. After some poking and prodding, I get him spewing out some really bad fake information about his company and its support. Eventually, after pointing out he didn't know jack, he hung up and then all I got was a disconnected message. How rude.
Sunday, January 24, 2016
Information Dump: Comptia Security+
So a few days ago, I passed the test to get my Security+. Now, I'm going to give you an idea of what the test was like. The reason I want to is because my cousin, who had already gotten the certification, said the test was easy. I was using the CertMaster material, and that stuff was hard as far as lots of little things to remember.
Well, here's the broad overview. Like the A+ tests, it includes simulations and multiple choice. The simulations were not exactly simulations so much as a visual word problem. The simulations were a bit confusing as far as the directions go, but once I understood what the goal was, it was easy.
The biggest problem I ran into was how the questions were worded. I had flagged a few for review and when I went through them again, I realized I had picked the wrong answer because I didn't understand the question correctly. So, I went through the whole test roughly three times before I ran out of time. When the questions were understood, the test itself was relatively easy, even for someone like myself with horrible test taking skills.
As far as must know material for the test, it jumped around a lot. I was assuming it would probably focus on some core concepts such as CIA or risk and controls, but that only seemed to be present in maybe two questions.
Either way, the test was easy to answer, just read the questions very carefully. Now here's my study guide/cheat sheet I made while studying for the test.
Comptia Security+ Reference
Well, here's the broad overview. Like the A+ tests, it includes simulations and multiple choice. The simulations were not exactly simulations so much as a visual word problem. The simulations were a bit confusing as far as the directions go, but once I understood what the goal was, it was easy.
The biggest problem I ran into was how the questions were worded. I had flagged a few for review and when I went through them again, I realized I had picked the wrong answer because I didn't understand the question correctly. So, I went through the whole test roughly three times before I ran out of time. When the questions were understood, the test itself was relatively easy, even for someone like myself with horrible test taking skills.
As far as must know material for the test, it jumped around a lot. I was assuming it would probably focus on some core concepts such as CIA or risk and controls, but that only seemed to be present in maybe two questions.
Either way, the test was easy to answer, just read the questions very carefully. Now here's my study guide/cheat sheet I made while studying for the test.
Comptia Security+ Reference
Subscribe to:
Posts (Atom)